iOS Setup
Learn how to implement Lens in an iOS application
Lens is a camera framework which captures C2PA-compliant verified photos and videos. After successful capture, photos contain assertions (such as location, date and time, used to verify the provenance of the image), and are cryptographically signed.
The camera itself has no user interface elements, allowing you to customize the look and feel to match your app's existing style. The SDK provides API for interacting with the camera's controls; initiating capture, turning flash on and off, etc.
Getting Started
Requirements
To build a project using Lens SDK the minimum requirements are:
- Lens iOS API key. Truepic requires the following information for production keys:
- App name - The name of the application as listed in the Apple App Store.
- App ID Prefix (or Team ID) - To locate, log in to developer.apple.com > Click on Certificates, IDs & Profiles > Identifiers
- Bundle ID - To locate, click your bundle ID. This opens the Certificates, Identifiers & Profiles page. Look for App ID Prefix.
- iOS Deployment Target 14.0+
- Xcode 13.0+
- Swift 5.0+
- LensSDK framework library
Xcode
Import the Framework library
- Drag the
LensSDK.xcframeworkfolder into your Xcode project directory underFrameworks. - When building to a Device, ensure that the
Targets > General > Frameworks, Libraries, and Embedded Contentsetting is set toEmbed > Embed & Sign - Set
Enable BitcodetoNo(only necessary in Xcode 14 and earlier).
This can be set inTargets > Build Settings > Build Options > Enable Bitcode > No
Application
Permissions
Lens needs user permissions to function: one for the camera, one for the microphone (optional), and another for location when in use. To facilitate this, the following property list keys must be added to your app's Info.plist. Either:
- Add the relevant
Privacykey from the Information Property List dropdown in Xcode, or - Manually edit the XML by right clicking on
Info.plistand selectingOpen As > Source Code.
Lens validates it has the necessary permissions and will issue an error to your application if the permissions have not been obtained.
Camera
| Key | Value (example) |
|---|---|
Privacy - Camera Usage Description | APPNAME requires access to the camera in order to capture verified photos. |
or
<key>NSCameraUsageDescription</key>
<string>APPNAME requires access to the camera in order to capture verified photos.</string>
Microphone
| Key | Value (example) |
|---|---|
Privacy - Microphone Usage Description | APPNAME will use the microphone when recording videos or audio. |
or
<key>NSMicrophoneUsageDescription</key>
<string>APPNAME will use the microphone when recording videos or audio.</string>
If microphone permissions are denied, videos will be captured without audio.
Location When In Use
| Key | Value (example) |
|---|---|
Privacy - Location When In Use Usage Description | APPNAME uses Location Services to validate the accuracy of your image's location. |
or
<key>NSLocationWhenInUseUsageDescription</key>
<string>APPNAME requires access to your location in order to validate the accuracy of your image's location.</string>
Recommendation for Initializing Lens
We recommend initializing Lens only once per application launch, and since enrollment can take several seconds to complete (depending on connection), Lens should be initialized before presenting the camera. For these reasons, we recommend that you initialize Lens in your application delegate or in a view controller or other object which will be around for the lifecycle of your application
Implementation
This section covers basic implementation and another section covers additional features.
Lens Class
The Lens class provides access to the main functions of the SDK.
LensCamera: used to capture photos, videos, and audio. Media captured by the camera is automatically cryptographically signed. Access via thecameraproperty.LensSigner: used to sign media brought into your app's environment by other means, for example: importing media from the user's file system. Access via thesignerproperty.LensVerifier: used to verify C2PA content on signed media. Access to the verifier is via theverifierconvenience property, but can also be accessed byLensVerifier's public initializer.
Camera Preview & Delegate Setup
- Start by importing the SDK in your App Delegate, or other long-lived class, and start enrollment using your API key. In the example below, we use the application delegate and then use dependency injection to pass our reference to
lensto the next controller. You can alternatively delay the initialization of Lens until later in the application lifecycle, but make sure the object that owns theLensclass is one that will be long-lived.
import LensSDK

var lens: Lens

func application(_ application: UIApplication, didFinishLaunchingWithOptions launchOptions: [UIApplication.LaunchOptionsKey : Any]? = nil) -> Bool {
    do {
        let lens = try Lens(with: "API_KEY")
        self.lens = lens

        // Use dependency injection to pass the camera and signer to the camera controller.
        if let cameraController = window?.rootViewController as? CameraViewController {
            cameraController.camera = lens.camera
            cameraController.signer = lens.signer
        }
    }
    catch {
        print("\(error.localizedDescription)")
    }

    return true
}
- Import the SDK in your view controller and implement the required
LensCameraDelegatemethods:
import LensSDK

class CameraViewController: UIViewController {
    var camera: LensCamera?
    var signer: LensSigner?

    ...
}

extension CameraViewController: LensCameraDelegate {
    func lensCameraDidFailWithError(_ error: LensCameraError) {
        // Called when an error is encountered during camera setup or configuration.
        // - Parameter error: the error thrown or passed from the internal frameworks.
    }

    func lensCameraDidGeneratePhotoThumbnail(_ imageName: String, _ image: UIImage) {
        // Called when the preview thumbnail has been generated.
        // - Parameter imageName: the name is composed of a UUID and a ".jpg" extension.
        // - Parameter image: A `UIImage` object with the smaller preview image.
        // The thumbnail has no C2PA claims or assertions, and is not cryptographically signed.
    }

    func lensCameraDidGenerateTruepic(_ imageName: String, _ truepic: Data) {
        // Called when the final signed image has been generated.
        //  - Parameter imageName:the same file name returned by the initial capture.
        //  - Parameter truepic: a block of data containing the signed and C2PA-compliant image data.
    }

    func lensCameraDidDisableCapture(for reason: LensCaptureDisabledReason) {
        // Called when a device configuration is encountered which requires that camera capture be disabled.
        // - Parameter reason: an instance of `LensCaptureDisabledReason`.
        // You should update the state of your camera controls to reflect this.
    }

    func lensCameraDidEnableCapture() {
        // Called when a previously encountered configuration has been resolved, permitting camera capture.
        // You should update the state of your camera controls to reflect this.
    }
}
- Initialize the Lens SDK and configure the camera session:
New in 1.9.0 is the ability to specify which version of the C2PA specification you would like to use at the time you configure the session. This target spec persists for the duration of the session. The available options are:
public enum TargetSpecOptions: Int {
    case onePointThree = 13 // 1.3
    case onePointFour = 14 // 1.4
    case twoPointOne = 21 // 2.1
}
func configureCamera() {
    // Instantiate camera
    guard let camera = self.camera else {
        print("Unable to instantiate Lens Camera.")
        return
    }

    // Pass a UIView object to the to SDK to display a camera preview view.
    // Setting fillView to true will fill the preview view, false will resize to fit within the preview view.
    //
    do {
        let targetSpec: Lens.TargetSpecOptions = .twoPointOne
        try camera.configureSession(previewView: self.cameraPreviewView, fillView: false, delegate: self, locationMode: LensLocationMode.optional, allowsImprecise: false, targetSpec: targetSpec)
    } catch {
        // handle error
      	print("\(error.localizedDescription)")
    }
}
The delegate can be any object that conforms to LensCameraDelegate.
Camera Capture Setup
Camera Mode
The default capture mode of Lens is photo. This can be changed by setting the following property:
final public var cameraMode: LensSDK.LensCameraMode
where LensCameraMode is the enum:
public enum LensCameraMode {
    case photo
    case video
    case audio
}
Photo Capture
Capturing photos with Lens camera is triggered by calling the beginCapture() method, typically within an IBAction:
@IBAction func photoCaptureTapped(button: UIButton) {
    guard let camera = self.camera else {
        print("Unable to find Lens Camera instance.")
        return
    }
    camera.beginCapture()
}
After the photo has been taken, but prior to C2PA processing and signing, Lens will return a UIImage containing a thumbnail of the photo in the following delegate method:
func lensCameraDidFinishInitialCapture(_ imageName: String, _ image: UIImage)
imageName- a UUID string
Once the capture has been signed, the following delegate method will be called:
func lensCameraDidGenerateTruepic(_ imageName: String, _ truepic: Data)
The final signed image is returned as a Data object to preserve C2PA assertions and metadata.
Saving the signed image to the iOS Photo Library is not recommended since UIKit classes do not support the metadata and features generated during image signing. Saving to your application's Documents directory using the Data.write(to: url) API is ideal.
Video Capture
To record a video, call the startVideoCapture method. To stop an in-progress recording, call stopVideoCapture.
@IBAction func videoCaptureTapped(button: UIButton) {
    guard let camera = self.camera else {
        print("Unable to find Lens Camera instance.")
        return
    }
    if camera.isRecordingVideo {
        camera.stopVieoCapture()
    } else {
        camera.startVideoCapture()
    }
}
When recording and C2PA-signing completes, the following delegate method will be called:
func lensCameraDidGenerateTruepicVideo(_ url: URL)
url- the location on disk to which the signed video is written.
If recording completes, but processing and signing fails, the following delegate method will be called:
func lensCameraDidGenerateUnsignedVideo(_ url: URL)
url- an unsigned video file path
While there are no restrictions on file size or duration to record verified videos and upload them to your server, there is currently a file size limit of 100 MB per video file uploaded to the Lens API for processing. This may not be necessary for your use case, but if so, we recommend limiting recording to under 45 seconds per video.
Handle errors
Errors will be surfaced to your app via the delegate method:
func lensCameraFailedWithError(_ error: LensCameraError) {}
where enum LensError is defined as:
Error | Description |
|---|---|
enrollmentError | An error occurred within the device enrollment process. Check that your API key is being passed properly, and that the App Attest service has been configured on your app's web server. Check attestation logs for any errors. |
timestampError | An error occurred when requesting a trusted timestamp. |
cameraSessionFailed | An error occurred which caused the currently configured camera session to fail. |
imageSigningFailed | An error occurred which caused the image signing process to fail. |
airplaneMode | Device is in airplane mode. Airplane mode must be disabled to allow capture. |
cameraPermissionDenied | Permission to the camera was denied. |
internalError | Some other error occurred. Check the localizedDescription for more information. |
Troubleshooting
"Device is not secure" error in Xcode
Good news, it is not expected that the camera will ever allow you to take photos while connected to Xcode, due to our security measures that prevent this. Instead, you'll need to test on a disconnected device:
- use Xcode to build the app and deploy it to a device.
- Once the app starts, stop it from running in Xcode and disconnect.
- Force kill the app and restart it. The camera should work.
Certificate errors, or photos aren't being taken
This error can occur if your App ID does not exactly match what we had on file when we issued your iOS API key. The App ID is a combination of the App ID Prefix (or Team ID) and bundle ID, joined by a period, for example XZBPL6P2LU.com.epic.analysis. We can help you check to make sure the App ID you are working with matches what we have registered for that key. If we need to update it, we can do so right away, without you having to change your key. If you need to manage more than one App ID, we can issue a key for each.
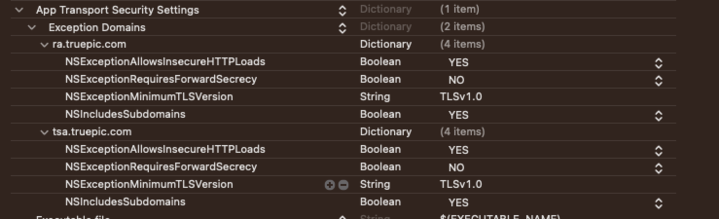
HTTP errors
In your logs, you may see ATS failed system trust and Connection 11: system TLS Trust evaluation errors. Lens makes calls to our time stamping authority (TSA) using HTTP. We must whitelist those host names in the application to allow the network calls to be successfully made. To do this, add these suggested plist values:
<key>NSAppTransportSecurity</key>
<dict>
	<key>NSExceptionDomains</key>
	<dict>
		<key>ra.truepic.com</key>
		<dict>
			<key>NSExceptionAllowsInsecureHTTPLoads</key>
			<true/>
			<key>NSExceptionMinimumTLSVersion</key>
			<string>TLSv1.0</string>
			<key>NSExceptionRequiresForwardSecrecy</key>
			<false/>
			<key>NSIncludesSubdomains</key>
			<true/>
		</dict>
		<key>tsa.truepic.com</key>
		<dict>
			<key>NSExceptionAllowsInsecureHTTPLoads</key>
			<true/>
			<key>NSExceptionMinimumTLSVersion</key>
			<string>TLSv1.0</string>
			<key>NSExceptionRequiresForwardSecrecy</key>
			<false/>
			<key>NSIncludesSubdomains</key>
			<true/>
		</dict>
	</dict>
</dict>
Which should look like this:
Updated about 2 months ago